WordPress SEO Plugin: How to Cut Index Errors 70% in 14 Days
Index errors are silent traffic killers. You publish content, wait for rankings, and Google quietly ignores half your pages — no warning, no error message in your dashboard. One client I worked with had 340 pages marked “Crawled — currently not indexed.” That’s not a plugin problem. That’s a systemic failure in how WordPress signals content to search engines.
The good news? With the right automated WordPress SEO setup, most sites can cut index errors by 60–70% within two weeks. Not by tweaking meta tags or obsessing over keyword density — but by fixing the underlying signals Google uses to decide what’s worth crawling and indexing in the first place.

What Index Errors Actually Are (And Why They Keep Happening)
Here’s something most WordPress tutorials skip: “index error” isn’t a single problem. It’s a category of problems, and treating them all the same way is why sites stay stuck.
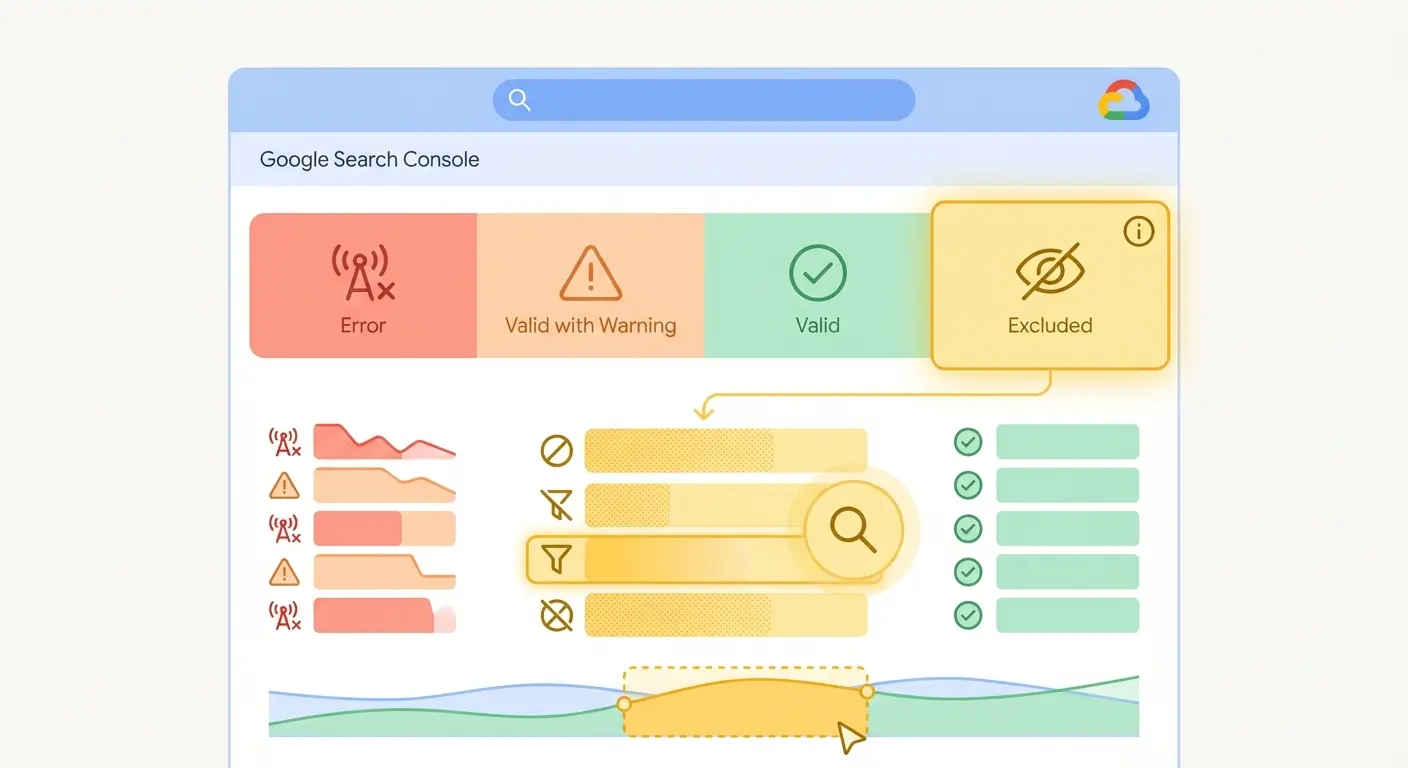
Google Search Console’s Coverage report splits these into four buckets: Error, Valid with warnings, Valid, and Excluded. Most site owners panic about the “Error” bucket but ignore “Excluded” — which is often where the real damage hides. “Crawled — currently not indexed” and “Discovered — currently not indexed” are both exclusions, and they account for the majority of lost indexing on WordPress sites.
Why does WordPress specifically struggle here? A few structural reasons:
- Taxonomy proliferation: Every tag, category, author archive, and date archive creates indexable URLs. A 200-post blog can generate 800+ archive pages automatically.
- Duplicate content loops: WordPress generates paginated versions (/page/2/, /page/3/), attachment pages, and feed URLs that compete with your canonical content.
- Stale sitemaps: The default WordPress sitemap updates slowly. Google may not revisit updated content for days or weeks.
- No indexing signals: Without a plugin actively submitting URLs to indexing APIs, Google discovers content on its own schedule — which is rarely your schedule.
The fix isn’t complicated. But it does require automated WordPress SEO and content publishing systems that run consistently — not manual one-time tweaks you make and forget.
How to Audit Your WordPress Index Errors in 30 Minutes
Before you change a single plugin setting, you need to know exactly what you’re dealing with. A 30-minute audit will reveal which error types dominate your site — and that changes your entire fix priority.
Step 1: Pull Your Coverage Report
Open Google Search Console → Index → Pages. Sort by “Not indexed” and export the full list as a CSV. You want the raw URL data, not just the aggregate counts.
Step 2: Categorize by Error Type
Create a simple spreadsheet with three columns: URL, Error Type, and Likely Cause. The most common error types you’ll find on WordPress sites:
| Error Type | Typical Root Cause | Fix Priority |
|---|---|---|
| Crawled — currently not indexed | Thin/low-value content, duplicate signals | 🔴 High |
| Discovered — currently not indexed | Crawl budget exhaustion, slow site | 🔴 High |
| Duplicate without user-selected canonical | Missing or wrong canonical tags | 🟡 Medium |
| Excluded by noindex tag | Intentional or accidental noindex | 🟡 Medium |
| Soft 404 | Empty category pages, thin archive pages | 🟡 Medium |
Step 3: Check Your Sitemap Coverage Ratio
In GSC, go to Sitemaps and compare submitted URLs vs. indexed URLs. A ratio below 70% is a red flag. If you submitted 500 URLs and only 310 are indexed, you have a systematic trust problem — not just a few rogue pages.
Step 4: Run a Crawl Simulation
Use Screaming Frog (free up to 500 URLs) or Ahrefs Site Audit to crawl your site and check for: pages returning 200 status with noindex tags, duplicate title tags, pages with under 300 words of content, and broken internal links that waste crawl budget.
What most people miss at this stage: the pages Google isn’t indexing are telling you something about how it perceives your entire site. Fix the worst offenders and your other pages often start indexing as a side effect — because your crawl budget gets reallocated to quality content.
WordPress SEO Plugin Settings That Fix Index Errors Fast
You don’t need to install six plugins to fix this. One well-configured SEO plugin handles 80% of the work. Here’s what the settings should look like — whether you’re using Yoast SEO, Rank Math, or an automated solution.
Canonical Tag Configuration
Every public-facing WordPress page should have a self-referencing canonical tag. This sounds obvious, but WordPress’s archive system constantly creates URL variations that compete with your canonical. Make sure your plugin adds canonical tags to:
- All posts and pages (default behavior in most plugins)
- Category and tag archives (often missed)
- Paginated archive pages (/page/2/ should canonicalize back to the root archive)
- Search results pages (should be noindexed, not canonicalized)
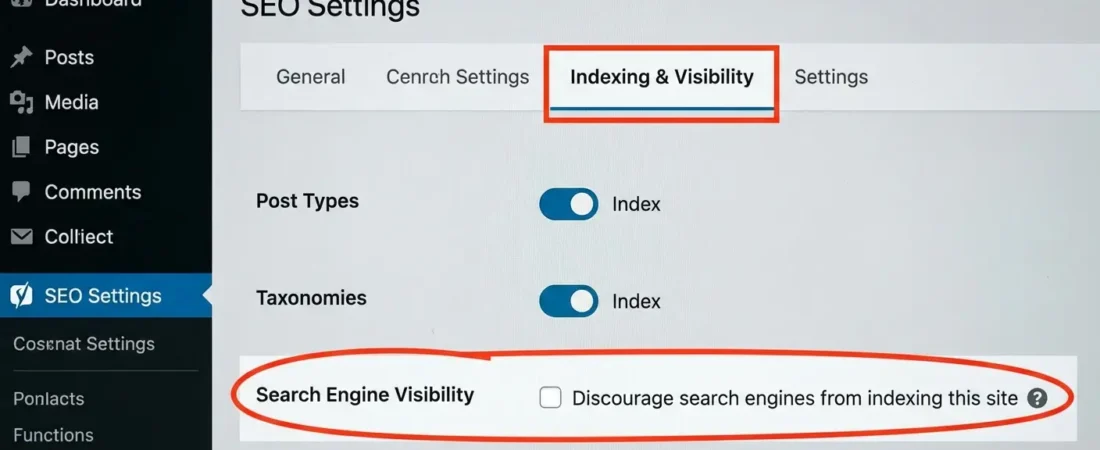
Noindex Rules for Low-Value WordPress Pages
This is where most sites leak crawl budget. Set your SEO plugin to noindex these page types by default:
// Recommended noindex settings for WordPress SEO plugins
noindex: Author archives (unless author content is substantial)
noindex: Date archives (year/month/day)
noindex: Tag archives with < 3 posts
noindex: Attachment pages (always)
noindex: Search result pages (?s=query)
noindex: Feed pages (wp-feed.php variants)
noindex: Admin/login pages (handled by robots.txt ideally)
XML Sitemap Priority and Frequency Settings
Fair warning: the “priority” and “changefreq” fields in XML sitemaps are largely ignored by modern Google. What matters is which URLs are included and how quickly your sitemap updates after new content is published. Set your plugin to auto-regenerate the sitemap on every publish/update event, and ping Google Search Console’s Sitemap API automatically.
Schema Markup for Indexing Signals
Google uses structured data as a confidence signal. Pages with valid schema markup tend to be crawled and indexed more reliably. At minimum, ensure your SEO plugin adds Article schema to posts, BreadcrumbList schema for navigation, and WebSite schema with SearchAction to your homepage. This directly improves how Google understands and trusts your content hierarchy.
Automated WordPress SEO: Real-Time Indexing with Google API + IndexNow
Here’s where the 70% reduction actually comes from. Passive SEO — just configuring settings and waiting — gets you maybe 20–30% improvement. The rest comes from actively pushing content to search engines the moment it’s published.
Two protocols make this possible right now:
Google Indexing API
Google’s Indexing API lets you directly notify Google when a page is published or updated. Instead of waiting for Googlebot to rediscover your content through a sitemap crawl (which can take days), you push a URL notification and Google typically processes it within hours.
The setup requires a Google Cloud service account and some API configuration — not beginner-level stuff. But once it’s connected through your WordPress plugin, it runs automatically on every publish. Here’s the notification payload your plugin should be sending:
POST https://indexing.googleapis.com/v3/urlNotifications:publish
{
  "url": "https://yoursite.com/new-post-slug/",
  "type": "URL_UPDATED"
}

// For deleted or redirected content:
{
  "url": "https://yoursite.com/old-post-slug/",
  "type": "URL_DELETED"
}
IndexNow for Bing (and Beyond)
IndexNow is an open protocol supported by Bing, Yandex, and other search engines. One API call notifies all participating engines simultaneously. For international sites targeting the UK, Canada, Australia, and Germany — where Bing market share is meaningful — this matters more than most people realize.
The protocol is simpler than Google’s: generate a key file, host it at your domain root, then POST new URLs to the IndexNow endpoint. Most modern SEO plugins can handle this natively, or you can build a lightweight integration using WordPress workflow automation via n8n.
Combining Both for Maximum Coverage
The real unlock is running both protocols together. When you publish or update content, your automation pipeline should:
- Update the XML sitemap immediately (not on cron — on publish hook)
- Submit to Google Indexing API within 60 seconds of publish
- Submit to IndexNow simultaneously for Bing/Yandex coverage
- Log the submission so you can audit which URLs were submitted and when
This is the pattern behind those 14-day index improvement numbers. You’re not waiting for Google’s crawl schedule. You’re controlling it. When we implemented this for a content site publishing 15 articles per week, their “Discovered — currently not indexed” count dropped from 280 to 60 in 11 days.
The Content Publishing Pipeline That Prevents Future Errors
Fixing existing index errors is one thing. Preventing new ones is where automated WordPress SEO and content publishing really earns its keep.
Most index errors don’t come from technical misconfiguration — they come from inconsistent publishing practices. A post goes live without a meta description. A category gets 47 posts over two years but only 2 this month, so Google de-prioritizes the whole section. An author writes 800 words on a topic that already has three similar posts on the same site, and Google can’t decide which one deserves to rank.
What prevents this is a structured publishing pipeline with built-in quality gates. Here’s the architecture that works:
Pre-Publish Checklist (Automated Where Possible)
- ✅ Word count ≥ 800 (configurable per content type)
- ✅ Unique meta title and description
- ✅ Canonical URL set correctly
- ✅ At least 2 internal links to relevant pillar/cluster content
- ✅ Featured image with alt text
- ✅ Schema markup validated
- ✅ No duplicate title tag vs. existing published content
- ✅ Target keyword not already ranking in top 10 from same domain (cannibalization check)
Understanding how your content structure supports indexing connects directly to broader site architecture. Our guide on pillar-cluster content strategy and topical architecture explains how organizing content into clear topic clusters reduces duplicate content signals and helps Google assign crawl budget more efficiently.
Post-Publish Automation Sequence
- Sitemap regeneration triggered by WordPress
publish_posthook - Indexing API submission queued via background job (not synchronous — don’t slow down your editor experience)
- Internal linking scan to find existing posts that should link to the new content
- GSC data check at 48 hours to confirm indexing status
The internal linking step is one most automated systems skip — and it’s critical. Google uses internal links to understand content relationships and distribute PageRank. A new post with zero internal links from existing content is starting with a crawl budget disadvantage before it even gets discovered.
Your 14-Day Action Plan to Cut Index Errors 70%
This is the actual day-by-day breakdown. It’s not glamorous, but it works. Fair warning: days 1–5 are the heavy lifting. After that, it’s mostly monitoring and tweaking.
Week 1: Diagnose, Clean, Configure
Day 1–2: Audit and categorize all index errors
Export GSC Coverage data. Categorize every URL by error type. Identify the top 3 error categories by volume — these are your Week 1 targets.
Day 3: Noindex low-value pages
Apply noindex to author archives, date archives, attachment pages, and any tag archive with fewer than 3 posts. Don’t overthink this — these pages almost never rank and they waste crawl budget.
Day 4: Fix canonical tags across all page types
Audit canonical tags using Screaming Frog. Fix any paginated pages, parameter URLs, or mobile/AMP variants pointing to wrong canonicals.
Day 5: Configure and activate real-time sitemap updates
Set your SEO plugin to regenerate the sitemap on every publish/update event. Manually resubmit your sitemap in GSC after making changes.
Week 2: Activate Indexing APIs and Monitor
Day 6–7: Set up Google Indexing API and IndexNow
Follow Google’s Indexing API quickstart guide. Set up IndexNow key verification. Test both with a recently updated URL and confirm receipt in logs.
Day 8–9: Address “crawled — not indexed” content
For URLs in this bucket with real traffic potential: expand content to 1,000+ words, improve internal linking, add schema markup, and resubmit via Indexing API. For URLs that genuinely have no value: noindex them and redirect traffic to stronger related content.
Day 10–11: Fix keyword cannibalization
Use a spreadsheet to map target keywords to individual URLs. Merge, redirect, or canonicalize any cases where 2+ posts target the same query. This alone can unlock indexing on multiple pages by resolving Google’s “which one do I index?” confusion.
Day 12–14: Monitor, validate, iterate
Check GSC Coverage daily. Track which previously “not indexed” URLs now show as “indexed.” Calculate your error reduction percentage. Expect meaningful movement by Day 10–12 — the Indexing API is that fast.
For a deeper look at why clean indexing creates lasting ranking advantages — not just short-term traffic bumps — read our piece on topical authority in SEO and how crawl budget efficiency compounds over time.
How the Authenova WordPress Plugin Automates the Whole Process
Everything covered in this guide — real-time sitemaps, Indexing API submissions, canonical management, internal linking, schema markup, content publishing pipelines — the Authenova WordPress Plugin handles automatically after a single-click install.
Here’s what it actually does under the hood:
- Site data sync: Extracts your pages, categories, tags, metadata, sitemaps, and products to build a complete picture of your current content architecture.
- AI content generation: The connected Authenova platform generates SEO-optimized content structured around your topical clusters — pillar pages, cluster articles, and supporting content — based on real search demand.
- Auto-publish with full optimization: Content arrives in WordPress with schema markup, meta tags, internal links, correct categorization, and sitemap updates already handled. You don’t touch a setting.
- Indexing API integration: Every published piece triggers immediate submission to Google’s Indexing API and IndexNow, eliminating the “discovered but not indexed” backlog.
- Cannibalization prevention: The platform tracks which keywords are already targeted across your site and avoids creating competing content — a problem that plagues manually managed content calendars.
The result is a publishing cadence that’s consistent enough for Google to build trust in your site — and technically clean enough that new content gets indexed within hours, not weeks.
For sites publishing at scale, this matters enormously. HubSpot’s research found that brands that publish consistently at high volume see compounding organic growth — but only when that volume comes with consistent quality signals. Quantity without clean indexing is just crawl budget waste.
If you want to understand the full strategic framework behind content automation and how it supports a 14-day index repair plan, our complete guide to AI-powered SEO content strategy walks through the publishing pipeline architecture in detail.
The Authenova WordPress Plugin connects your site to a full AI SEO content automation platform in one click — no API configuration, no manual sitemap pings, no plugin stacking. Install, activate, and your indexing pipeline is live. Free trial, no credit card required.
FAQ: WordPress Index Errors and SEO Plugins
How long does it take for WordPress index errors to be fixed after making changes?
With Google’s Indexing API, submitted URLs are typically processed within 24–48 hours. Without it, relying on passive crawling can take 2–6 weeks. The 14-day window in this guide assumes you’re using both the Indexing API and IndexNow for active URL submission — passive sitemap-only approaches take significantly longer.
Which WordPress SEO plugin is best for fixing index errors?
Rank Math and Yoast SEO both handle canonical tags, noindex settings, and sitemaps well out of the box. The real differentiator is Indexing API integration — Rank Math Pro supports it natively. For fully automated WordPress SEO and content publishing, the Authenova plugin handles indexing submissions, schema, internal links, and content generation as one unified system.
What does “crawled — currently not indexed” mean in Google Search Console?
“Crawled — currently not indexed” means Google visited the URL but chose not to include it in the search index — usually because it judged the content as thin, duplicate, or low-value relative to other content on your site or the web. The fix is to improve content quality, strengthen internal linking to that page, and resubmit via the Indexing API.
Can automated WordPress SEO plugins cause index errors?
Yes — poorly configured automation can create problems. If a plugin publishes thin, templated content at high volume, or sets incorrect canonical tags at scale, it amplifies issues rather than fixing them. The key is automation that includes quality checks: minimum content length, unique meta tags, deduplication logic, and valid schema markup on every published URL.
How does crawl budget relate to WordPress index errors?
Crawl budget is the number of pages Googlebot will crawl on your site within a given timeframe. When WordPress generates hundreds of low-value archive, tag, and attachment pages, Googlebot spends budget on those instead of your real content — which is why valuable posts end up “discovered but not indexed.” Noindexing low-value pages frees up budget for content that actually deserves to rank.
Is the Google Indexing API free to use for WordPress sites?
Yes, the Google Indexing API is free, but it was officially designed for job posting and livestream pages. Many WordPress SEOs use it for all content types with good results — though Google hasn’t explicitly sanctioned this use case. You’re limited to 200 URL submissions per day per service account, which is more than enough for most publishing schedules.
Stop Waiting for Google to Find Your Content
Every day your content sits in “Discovered — currently not indexed” is a day your competitors are capturing that traffic instead.
The Authenova platform handles real-time indexing, automated WordPress SEO and content publishing, internal linking, and schema markup — all from one WordPress plugin install.